Curtains are a great and simple way of transforming your room and making it warmer.
This is a standard guide for installing a curtain pole, your specific pole type will be supplied with full relevant instructions.
WHAT YOU NEED:
For this task, you’ll need the following:
Drill
Drill Head
Screwdriver
Tape Measure
Spirit Level
Knife
Curtain Poles
Curtain Hooks
Curtains
Once you’ve put these materials and tools together, use the following steps to fit your curtain poles:
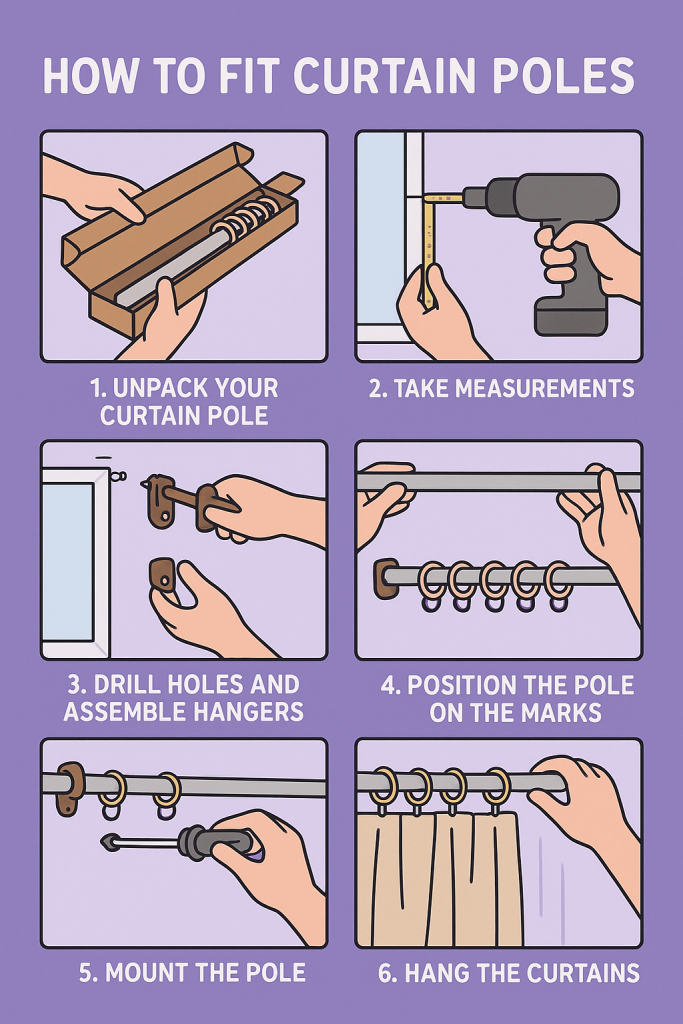
STEP 1: UNPACK YOUR CURTAIN POLE
Once you’ve unpackaged your curtain pole, you’ll need to check and ensure that everything is available. Once you’re certain that everything is ok, go ahead and unpack your hardware. Alongside the pole, there needs to be hooks (typically 3 in total). The hooks should also have 3 parts plus the required screws for fixing them to the wall.
STEP 2: TAKING MEASUREMENTS
There are usually measurements and instructions for fitting most curtain poles that come with them. In the instructions, you should find the distance between the bracket on both the left and the right and the outside window. Follow the instructions indicated on the manual of the curtain pole plus the measurements specified by the manufacturer of the poles.
STEP 3: FINDING THE LEVEL AND MARKING HOLES
The first thing here is to mark a vertical level line to allow you to nicely get the two screws level. You have the option of doing this with a normal spirit level. However, you could also achieve the same goals by using a set square. This is especially handy if you’re mounting your pole on a wooden batten.
Use the spirit level once again to find the horizontal level as well. This can be done by mounting it to the door and shooting the level at the window. This way, the task becomes rather easy. Alternatively, a tape measure and a normal level can be used and it’s even easier this way.
You should then mount your curtain pole on a wood batten and use its bottom as the point of reference. The brackets will require two holes. Therefore, mark the first on the level line.
STEP 4: DRILL HOLES AND ASSEMBLE HANGERS
The fourth step here is to drill the holes. Depending on the material the pole is to be mounted on, there’ll be different methods of doing this. If it’s to be done on a wooden batten, you’ll need to drill small pilot holes for your screws. Otherwise, if the pole is to be mounted directly into plasterboard or brick, wall plugs will be required.
STEP 5: MOUNT THE POLE
Finally, the poles are to be mounted. It should fit very nicely if the previous steps were done properly. Ensure you’ve evenly split the rings of the curtain on the hanger’s two sides. Remember to put one hoop on the end hangers outside.
STEP 6: HANG THE CURTAINS
Ensure you hang your curtains back. You’ll need different methods of doing this depending on the type of curtains you’ve chosen. Then, add the hooks of the curtain, since there are different ways to do this, use the method that suits you according to the instructions given.
If you are looking to fit new curtains or blinds into your home and wish to talk to someone about what’s available feel free to contact us.
Posted by:
Kieren Wills
Kieren Wills has worked in the blinds and curtains industry for over 20 years and now leads the team at Concorde Blinds with a passion for delivering exceptional service and bespoke solutions. His wealth of experience ensures every project is handled with expertise, from consultation to installation, tailoring each product to meet customer needs. Kieren thrives on building strong relationships with clients, helping them transform their spaces with stylish and functional window treatments. Outside of work, he enjoys spending time with his family and exploring the outdoors, always bringing his enthusiasm and dedication to everything he does.